


Table of Contents
- Start With Scale and Proportion: The 2/3 Rule for Small Walls
- How to Hang Art Without Damaging Walls in a Rental
- Choosing Original Art for Small Rooms: What Actually Works
- The Benefits of Hand-Embellished Prints in a Compact Space
- Gallery Wall Layouts for Small Rooms: Vertical and Grid Arrangements
- Building a Cohesive Aesthetic: Color, Negative Space, and Focal Points
- Common Mistakes When Styling Art in Small Apartments
- Conclusion: Making Your Small Apartment Feel Like a Gallery
- Frequently Asked Questions
Last Updated: September 16, 2026
Start With Scale and Proportion: The 2/3 Rule for Small Walls
The single most common mistake when you learn how to style art in small apartments is art that is too small for the wall it hangs on. A tiny canvas floating in the middle of a large blank wall makes a room feel unfinished and cramped at the same time.
The fix is the 2/3 rule: your art, or your grouping of art, should span roughly two-thirds of the width of the furniture below it.
How to Hang Art Without Damaging Walls in a Rental
Renter-friendly hanging comes down to matching the hardware to the weight of the piece and the structure of the wall behind it. Get either wrong and you either lose your deposit or lose your art.
Adhesive Strips, Command Strips, and Weight Limits
Adhesive strips are rated for a specific load, and that rating assumes an ideal surface: smooth, clean, fully cured paint, at room temperature. In practice, the rating drops on humid walls, in warm rooms, on freshly painted surfaces that have not cured, and on textured wallpaper or brick. A strip rated for a few pounds may hold only a fraction of that in a bathroom or above a radiator.
Matching Hardware to Wall Type and Art Weight
The mechanism matters as much as the rating. Here is how the common options actually behave in an apartment:
- Adhesive strips. Best for lightweight, flat pieces. They leave no hole, but they can pull paint or leave residue on removal, especially on fresh paint. Clean the wall with rubbing alcohol first, press firmly for the full recommended time, and let the adhesive cure before hanging.
- Small nails and picture hooks. A single nail hole is easy to patch with spackle before move-out. A hardened steel picture hook driven into a stud holds far more than the same hook in hollow drywall. Use a stud finder, or tap along the wall until the sound changes from hollow to solid.
- Self-drilling drywall anchors. These work in hollow drywall and hold more than a bare nail, but they are not a substitute for a stud when the piece is heavy. Follow the anchor's stated weight limit and stay well under it.
- Toggle bolts. For a heavy framed piece or a large canvas on hollow drywall, a toggle bolt spreads the load behind the wall and is one of the most secure options that still leaves a patchable hole.
Weight-Bearing Limitations Most Guides Ignore
A common pattern is that a frame feels heavy in your hand, and it is too heavy for a strip. As a rough guide, a small framed print under a few pounds is fine on adhesive; a glazed frame of any real size is not. Glass adds significant weight, and a large glazed frame can easily exceed what any adhesive strip will hold safely.
Choosing Original Art for Small Rooms: What Actually Works
Original art earns its place in a small room because it gives the eye somewhere to rest. A compact space has less room for visual noise, so each piece has to carry more weight.
Practical selection rules for compact spaces:
- Choose one strong focal point rather than several competing pieces
- Favor square formats, which fit narrow walls and stack cleanly
- Pick colors that echo something already in the room, a cushion, a rug, a lamp
- Buy the largest piece the wall can hold, not the smallest
The Benefits of Hand-Embellished Prints in a Compact Space
Hand-embellished prints give you the presence of an original at a lower commitment, which matters when you are furnishing a small apartment on a budget. The artist adds paint to a printed base, so every piece carries real texture and slight variation that a flat print cannot match.
Gallery Wall Layouts for Small Rooms: Vertical and Grid Arrangements
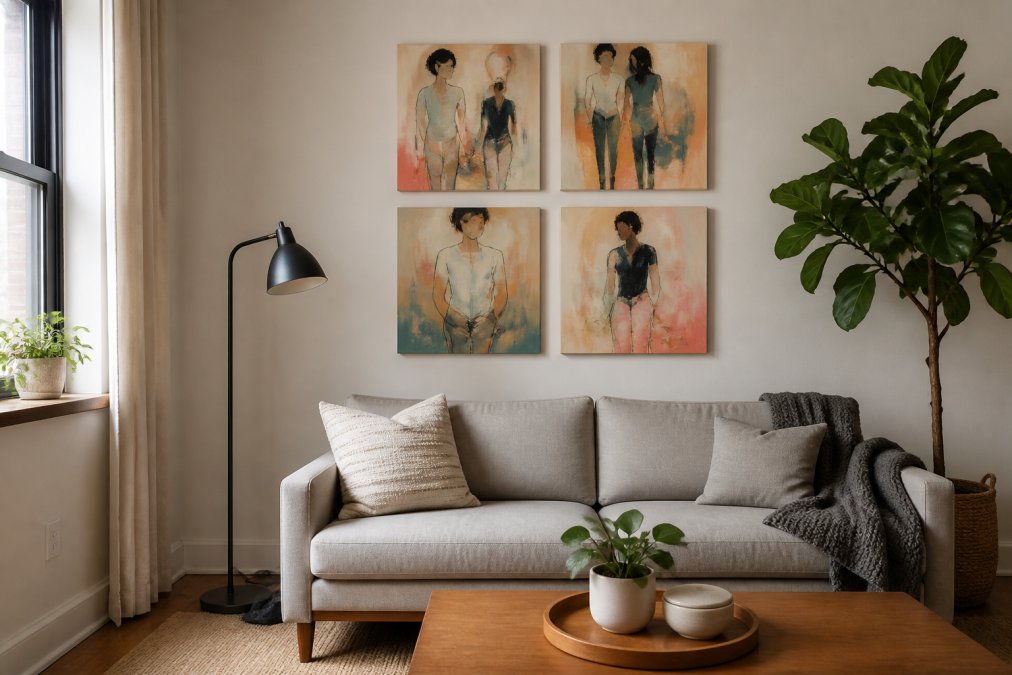
The vertical column. Stack three to five pieces in a single column above a narrow console or in a hallway. Keep the spacing consistent, two to three inches between frames, and center the column on the furniture below. For a column, the total height should span roughly two-thirds of the wall height above the anchor furniture, and the bottom piece should sit about six to eight inches above the console or tabletop so it does not crowd the surface.
Branches by Annette Back -12x12, set of →
Art Placement for Non-Traditional Layouts
Most guides assume a standard rectangular wall with furniture centered beneath it. Apartments rarely cooperate. Here is how to handle the layouts that actually show up:
- Studio alcoves and sleeping nooks. A single vertical column fits an alcove better than a horizontal spread because it uses the narrow width without spilling past the opening. Center the column on the alcove, not the room.
- Awkward corners. A corner is a natural home for a single tall piece or a two-piece vertical stack. Angle the art so it faces the room's main sightline rather than sitting flat against one wall.
- Behind-door spaces. The wall behind a door that opens inward is dead space for most furniture but fine for a flat piece or a shallow ledge. Keep the art flush and confirm the door clears it when fully open.
- Walls broken by windows or doors. Do not try to center a gallery wall on a wall that is not symmetrical. Anchor the arrangement to the furniture below instead, and let the wall's irregularities stay quiet.
Floating Shelves and Ledges as an Alternative to Nails
Picture ledges let you rest art on a shelf instead of hanging it, so you can rearrange a layout without touching the wall. This suits renters and anyone who likes to rotate pieces seasonally. A ledge also lets you layer a small framed print in front of a larger canvas, which builds depth without extra wall space. Keep each ledge to a few pieces so it does not read as clutter, and mount the ledge into studs or with toggle bolts, since a loaded ledge carries more weight than a single frame.
Building a Cohesive Aesthetic: Color, Negative Space, and Focal Points
A cohesive aesthetic in a small apartment comes from restraint, not accumulation. Negative space is a design element, not wasted wall. Leaving a generous margin around a single strong piece gives it room to breathe and keeps a compact room from feeling busy.
Common Mistakes When Styling Art in Small Apartments
Most small-space art problems trace back to a handful of recurring errors:
| Mistake | Why It Hurts | The Fix |
|---|---|---|
| Art hung too high | Disconnects art from furniture, shrinks the room | Center art at 57-60 inches from the floor |
| Art too small for the wall | Leaves the wall looking empty and unfinished | Follow the 2/3 rule for width |
| Too many small pieces | Creates visual clutter in a tight space | Consolidate into one grid or column |
| Heavy frame on adhesive strips | Strip fails, art and wall both damaged | Match hardware to weight, use a nail for heavy pieces |
| No color tie-in | Art feels random against the room | Echo one art color in a cushion or rug |
Conclusion: Making Your Small Apartment Feel Like a Gallery
Knowing how to style art in small apartments is really a lesson in editing. You are choosing fewer, better pieces and giving each one the space to matter.
Frequently Asked Questions
What is the 2/3 rule for wall art in a small apartment?
The 2/3 rule says art should span about two-thirds the width of the furniture below it, such as a sofa or console. In a small apartment, this keeps a single piece from looking lost on a narrow wall. For a 60-inch sofa, aim for art that is roughly 40 inches wide. If you use a set like Branches by Annette Back (four 12x12 canvases), the full arrangement covers 48 inches, which suits a larger piece of furniture.
How do you arrange art in a small room without making it look cluttered?
Limit the number of pieces and give each one breathing room. A common approach is the 3-5-7 rule: use an odd number of items in a group so the eye has a center. Keep at least 2 to 3 inches of negative space between frames. In a compact room, one larger statement work or a tight grid of same-size squares reads calmer than a scattered mix of shapes and sizes.
Can you hang large-scale art in a small apartment?
Yes, and it often works better than many small pieces. A single large canvas can act as a focal point and make a small room feel intentional rather than crowded. Just follow the 2/3 rule and leave negative space around the edges. If your wall is narrow, a vertical stack of smaller works, like a set of 12x12 inch canvases, gives similar impact without overwhelming the space.
What are the best ways to display original art in a rental?
Renter-friendly options include adhesive strips rated for the weight of your piece, picture ledges or floating shelves, and freestanding easels on a console or floor. Command strips work well for lightweight prints and small canvases, but check the weight limit before hanging. For heavier original oil paintings, a narrow picture ledge screwed into a stud or a floor easel avoids wall damage while keeping the work secure.


0 comments